


Adding of Multiple Email Accounts in Email App in Samsung Galaxy S4

As we all know that Email app in the Samsung Galaxy SIV has the ability to manage multiple email accounts. That's why, if you have more than one email accounts then you can add all of them into your phone so that you'll be easier to manage all of your email accounts in one place, such as send, receive, reply, forward or delete email messages in the required email account according to your need. FYI, it's not the same as when you add an account in Gmail app, in Email app you can't create a new email account, you're only allowed to add your existing email accounts that you have made before through email-provider websites.
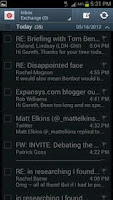
Moving Between Email Accounts
The ability to manage multiple email accounts owned by the Samsung
Galaxy SIII is one of the reasons why lot of peoples decide to choose
this Android-based smartphone as their devices. Moreover, this phone
also provide the stock Email app to facilitate users to receive or send
email through it. By using this app you can easily add a POP3 e-mail
accounts, Microsoft Exchange email accounts, etc.
The stock Email app also allows you to manage multiple email at once with ease. You can switch between your email accounts to use them to send an e-mail message or to check whether you have an incoming email message or to do something else you want with them, such as reply, forward or delete email messages in the selected account.
How to switch between email accounts in Email app?
Here are the steps you need to do :
By knowing this step, now you can easily switch between email accounts when you want to do something with another email account. So, hope this helps :)
The stock Email app also allows you to manage multiple email at once with ease. You can switch between your email accounts to use them to send an e-mail message or to check whether you have an incoming email message or to do something else you want with them, such as reply, forward or delete email messages in the selected account.
How to switch between email accounts in Email app?
Here are the steps you need to do :
- Open Email app .
- Here you can see the Email app display your email messages from the active email account .
- Tap the account name box at the top of the screen in the right side of the Email app icon to see the drop down menu contains all of your email accounts, and then choose the account you want to view . You can also choose Combined view which will display all of your email messages from all of your email accounts .
- Your email messages from the selected account will be displayed . From here you can read, send an email message, etc.
By knowing this step, now you can easily switch between email accounts when you want to do something with another email account. So, hope this helps :)
Samsung Galaxy S3: How to Save Email Message
Sending messages via email is one way that you can use to communicate
with others, either for personal or business purposes. To meet that
need, the Samsung Galaxy SIII have included the stock Email app inside
it so you can directly use this app without having to install it first
by yourself. With this app you can either send or receive email
messages.
When you read an email message with this app, you can also utilize some option available there, such as reply, forward or delete the email message. In addition, you can also save the email that you want for further use.
How to save email message?
Below are the steps below:
Later, you can view all saved email directly through My files app or another File Manager app without having to launch Email app anymore. So, hope this helps :)
When you read an email message with this app, you can also utilize some option available there, such as reply, forward or delete the email message. In addition, you can also save the email that you want for further use.
How to save email message?
Below are the steps below:
- Open Email app.
- If you have more than one account, select the desired email account by tapping the Email account name in the right side of the Email icon, and then in the drop down menu tap the desired email account.
- Tap the required email messages you wish to save.
- Tap the Menu key then select Save email.
- The selected email message will be saved as .eml files in the sdCard/Saved Email/youremail.eml
Later, you can view all saved email directly through My files app or another File Manager app without having to launch Email app anymore. So, hope this helps :)
Samsung Galaxy S3: How to Change Recording Mode

Samsung Galaxy SIII has come with the advanced camera that equipped with
some features and capabilities which will allow you to take a better
picture. Aside from using the camera to take a picture, you can also use
it to record video in HD.
Next, you can save the video files or send it to another you wish to share with through the Messaging app or Email app. For the record, the Messaging app or Email app has a limitation on how large the size of the video file allowed to attach by the app. Luckily, there is an option to limit the video size for SMS or email.
How to limit video recording size?
To do so, kindly follow the steps listed below:
By knowing how to change the recording mode, now you can set it according to your need. For instance, if you record the video and want to send it through the message, then you can set the recording mode to Limit for MMS. So, hope this helps :)
Next, you can save the video files or send it to another you wish to share with through the Messaging app or Email app. For the record, the Messaging app or Email app has a limitation on how large the size of the video file allowed to attach by the app. Luckily, there is an option to limit the video size for SMS or email.
How to limit video recording size?
To do so, kindly follow the steps listed below:
- Open Camera app.
- If necessary, switch the camera icon to the video recorder icon.
- Tap the Settings icon.
- On pop up menu select Recording mode.
- Here you'll see three option available, they are:
- Normal: this mode will limit the video by available space on the default storage.
- Limit for MMS: this mode will limit the video by MMS size restrictions.
- Limit for email: this mode will limit the video by email size restrictions.
- Now, you're ready to record the video.
By knowing how to change the recording mode, now you can set it according to your need. For instance, if you record the video and want to send it through the message, then you can set the recording mode to Limit for MMS. So, hope this helps :)
Changing of Background Color Changed in Email Apps
One way that you can do to save more battery life is by enabling power
saving option. You can find four options available under this option,
all of them are there to helps your phone save as much as possible the
battery life.

Unfortunately, enabling power saving may result in less power to consume by the device that sometimes caused the phone not to work as your expectations. One of which is you may find the background color in Email apps arbitrarily is changed, either black background or white background.
How to solve background color changed in Email apps?
Below are the steps to do to solve the problem:
Once you do these steps, now the problem of the email background color changed should be resolved. However, if you have your own solution to fix this problem, then I'll appreciate if you willing to share them here through the comment below :)
Unfortunately, enabling power saving may result in less power to consume by the device that sometimes caused the phone not to work as your expectations. One of which is you may find the background color in Email apps arbitrarily is changed, either black background or white background.
How to solve background color changed in Email apps?
Below are the steps to do to solve the problem:
- Go to Settings.
- Tap Power saving.
- Disable the Background colour option. When the box next to this option is unchecked means this option is turned off.
- Tap Home button to return to the Home screen.
Once you do these steps, now the problem of the email background color changed should be resolved. However, if you have your own solution to fix this problem, then I'll appreciate if you willing to share them here through the comment below :)
Samsung Galaxy S3: How to Share Selected Text in the Web Page
Web search is one of the option available when you're selecting text in
the web. By using this option you can search whatever the text selected
directly from the web, and you will find the search result be displayed
in the default search engine page.
While you selecting text in the web, you can also find another option available called Share. This option will allow you to share the highlighted text in the web to another device through several ways, such as via Bluetooth, Email, Gmail, Messaging or Wi-Fi Direct.
How to Share highlighted text in the web page?
If you wants to share text in the stock Browser apps in Samsung Galaxy SIII to another device by using some options available there, then below are the steps you need to do:
By knowing how to share the selected text in the web to another device using some methods, now you can share a useful information in the web easily by using one of the available methods as mentioned above. So, hope this helps :)
While you selecting text in the web, you can also find another option available called Share. This option will allow you to share the highlighted text in the web to another device through several ways, such as via Bluetooth, Email, Gmail, Messaging or Wi-Fi Direct.
How to Share highlighted text in the web page?
If you wants to share text in the stock Browser apps in Samsung Galaxy SIII to another device by using some options available there, then below are the steps you need to do:
- Open the stock Browser apps.
- Navigate to the required web page.
- Tap and hold the text until the text select is shown. You can adjust the text selected area by tapping and drag one of the anchor points at the selected text. The text selected will be highlighted.
- Tap Share icon at the top area of the display.
- Now, you'll see some options available to share, such as:
- Bluetooth: choose this option to share the selected text to another Bluetooth-capable device. Make sure both of the devices to enable the Bluetooth to do so.
- Email: choose this option to share the selected text via Email. This will copying the selected text to a new email message in the Email apps. When you have multiple email accounts, then you will be asked to choose which the account you want to send the email with. But, if you've already set the default email account, then it will automatically use this account to send the email with.
- Gmail: choose this option to share the selected text via Gmail. This will copying the text selected to a new email message in the Gmail apps.
- Messaging: choose this option to share the selected text via messaging. This will copying the text selected to a new text message in the Messaging apps.
- Wi-Fi Direct: choose this option to share the selected text by connecting to another Wi-Fi capable device.
- Choose the required option you wish to use to share the text.
- The selected text will be sent to another device by using the selected methods.
By knowing how to share the selected text in the web to another device using some methods, now you can share a useful information in the web easily by using one of the available methods as mentioned above. So, hope this helps :)

How to Changing Email Check Frequency
One of the most common problem experienced by users of the Samsung
Galaxy SIII is the poor battery life issue. This is caused mainly by the
existing features and a huge screen owned by this phone that requires a
lot of power to run. Fortunately, this phone was comes with a removable
battery that will allow you to replace it with the new ones if it have a
problem or broken.
In addition to replace with an extended battery, there are some ways that you can do to get better battery life, such as: using useful apps, turning off unused features, set the screen settings, etc.. Another thing you can also do to help prolong battery life is by changing the email syncing frequency becomes longer.
How to change the email check frequency?

When your phone checks for new email messages more frequently, then it will access the mobile network more often, means your phone will use more lot of battery consumption. Set this option down will help you to save more battery consumption and prolong your battery life. To do so following the steps below:
- Go to Apps through Home screen.
- Scroll to Email, then tap on it.
- Tap the Menu key.
- On the pop up menu select Settings.
- Tap the required email account you wish to change its syncing frequency.
- Tap Email check frequency.
- On the pop up menu select which option you wish to use, for example: Every hour. More rarely its frequency means save more battery consumption. When the dot indicator next to the option shows green means the option is selected.
- Finish. Now the setting has been changed and your phone will check for new email in accordance with the frequency that you specified before.
Well, by knowing on how to change the email check frequency, now you can save more battery consumption which means that you have helped to prolong your battery life. So, try this useful tips then share your experience here through the comment below :)
Composing and Sending Gmail Email Messages with Attachment


Android operating system inside Galaxy SIII will allow you to use Google
service easily by activating your Google account first on your phone.
Once you activate your Google account, you will be able to use all Google service directly through your phone, such as using youtube to search or upload video, download a certain useful apps through Google Play Store, using Google Now or Sending an email through Gmail.
How to write and send Gmail email message with attachment?
Once your Google account is active on your phone and your have an internet connection, then to do so you just need to follow the easy steps below:

- Go to Apps through Home screen.
- Scroll to Gmail, then tap on it.
- To create new email tap the new email message icon located on the bottom left corner on your phone.
- Enter recipient's email address in To: field by key in the first letters of the required contact then the contact which match will displayed, tap to the required contact you want to send a Gmail message. Or you can write down the recipient's email address if the required email address has not been added yet on your contact.
- To add more recipient's email address you can repeat the previous step.
- Write the title of email in Subject field.
- Tap Compose email.
- Write your message here.
- To attach picture or video tap the Menu key then on the pop up menu select Attach file.
- Go to the folder where the required picture or video located, then tap the required picture or video you want to attach on your Gmail message.
- To send your Gmail message tap send icon located on upper right corner.
- Finish. Now your Gmail message will send to the selected contact.
Well, by knowing on how to compose new Gmail message then send it directly through your phone, now you can stay keep in touch and communicate with your friend, family or co-workers easily. So, try this useful tips then share your experience here through the comment below :)
Changing of Email Account Settings
In Samsung Galaxy SIII you can add more than one email account to use
them directly through your phone. You can also set one of them as the
default account that will allow your phone to send email from this
account by default.
While you use these account, you may experience some problem such as can't sending or receiving email message. Due to this reason you may have to change some settings on this account.

How to edit email setting?
Before you do this, make sure you're connected to internet and ensure the new setting is correct and work well when you use it on your PC. As written on bell.ca, you can change the required email setting by following the steps listed below:
By knowing on how to do this, now you can use it as a solution when you experiencing problem sending or receiving email message on your phone. To obtain the correct setting for your email account, you can contact your email provider due to when you enter the wrong settings on your account will make your phone can't sending or receieving email message. So, try this useful tips when you face this problem and situation then share your experience here through the comment below :)
While you use these account, you may experience some problem such as can't sending or receiving email message. Due to this reason you may have to change some settings on this account.
How to edit email setting?
Before you do this, make sure you're connected to internet and ensure the new setting is correct and work well when you use it on your PC. As written on bell.ca, you can change the required email setting by following the steps listed below:
- Go to Apps through Home screen.
- Scroll to Email, then tap on it.
- Tap the Menu key.
- On pop up menu select Settings.
- Here you will see a list of your added email account, then tap the required account that you wish to change.
- Tap Outgoing settings. Due to it's the most common settings to change.
- Change the SMTP server name with the new ones.
- Tap Port field and edit the port number with the new ones.
- Tap Hide keyboard key on virtual keyboard.
- Tap Done button to save your changes.
- Finish. Now your selected email account setting has been change.
By knowing on how to do this, now you can use it as a solution when you experiencing problem sending or receiving email message on your phone. To obtain the correct setting for your email account, you can contact your email provider due to when you enter the wrong settings on your account will make your phone can't sending or receieving email message. So, try this useful tips when you face this problem and situation then share your experience here through the comment below :)
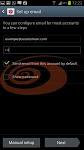
Setting of Added Email Account as Default
By using Samsung Galaxy SIII you can add more than one email account in
order to use them directly through your phone. You can add POP3 email
account or Microsoft Exchange email account.
Here you can also set which added email account that you wish to use as default email account on your Galaxy SIII.

How to set default email account?
As written on bell.ca, if you have more than one email account on your Galaxy SIII then you can set one of them as the default account by following the steps below:
By knowing on how to set one of your added email account as default, then you can send email from this account by default. For the record, you can still write and send email from non-default email account by choosing the "from" account when you composing new email message. So, try this useful tips then share your experience here through the comment below :)
Here you can also set which added email account that you wish to use as default email account on your Galaxy SIII.
How to set default email account?
As written on bell.ca, if you have more than one email account on your Galaxy SIII then you can set one of them as the default account by following the steps below:
- Go to Apps through Home screen.
- Scroll to Email, then tap on it.
- Tap the Menu key.
- On pop up menu select Settings.
- Here you will see a list of added email account, then tap the required email account that you wish to use as default.
- Set it as default by tick the checkbox next to Default account option.
- Finish. Now your selected email account has successfully set as default.
By knowing on how to set one of your added email account as default, then you can send email from this account by default. For the record, you can still write and send email from non-default email account by choosing the "from" account when you composing new email message. So, try this useful tips then share your experience here through the comment below :)
Removing of Email Account in Samsung Galaxy S3
In addition to adding the email, here you can also delete one or more your email account that you added previously. But, note that once you delete an email account, then associated contacts, calendar and all email messages in this account will also be removed.

How to delete added email account?
As written on bell.ca, if you want to do so then kindly following the steps below:
- Go to Apps through Home screen.
- Scroll to Email, then tap on it.
- Tap the Menu key.
- On the pop up menu select Settings.
- To delete an added email account tap Delete button or the trash symbol located on the top right corner of your phone's screen.
- Here you can select which email account you want to delete by tapping on the required email account.
- Tap the Delete button.
- Confirm the account that you want to delete by tapping Delete button.
- Done. The email account has been successfully removed from your phone.
Well, you may want to delete one of your e-mail account if you already do not want to use it again, but this method also can be used if the account are having problems, you can remove it then add it again. So, hope this articles useful for all of you :)
Reading of Email Messages in Samsung Galaxy S3
As has been discussed before, by using Samsung Galaxy SIII you can check
or send e-mail everytime you want with ease after you add your email
account on your phone.
Once you successfully add one or more email accounts on your phone, now you can use the account that you added to check, read, reply. forward, etc. on incoming email on your account.
How to read an incoming email messages?
As written on optus.com.au, once you have finished adding the email account in your phone, the one that you can do is read the incoming email on your account. To do so following the steps below:
By knowing how to read an email message through your Galaxy SIII, now you do not have to worry about missed an important message that is sent to your email. So, try this useful tips then share your experience here through the comment below :)
Once you successfully add one or more email accounts on your phone, now you can use the account that you added to check, read, reply. forward, etc. on incoming email on your account.
How to read an incoming email messages?
As written on optus.com.au, once you have finished adding the email account in your phone, the one that you can do is read the incoming email on your account. To do so following the steps below:
- Go to Apps through Home screen.
- Scroll to Email, then tap on it.
- Here you can select your email account by tapping the name of the email account.
- Tap the required email account.
- To retrieve your email messages tap the refresh icon.
- To read your email message tap the required email message you want to read.
- Tap Home button to return to the Home screen.
By knowing how to read an email message through your Galaxy SIII, now you do not have to worry about missed an important message that is sent to your email. So, try this useful tips then share your experience here through the comment below :)
Adding of Microsoft Exchange Email Account
One of the useful ability that belongs to the Samsung Galaxy SIII is the
ability to check and send emails at any time with ease. Of course,
before you can use it, you must first add your email account in your
phone.
Here you can add multiple emails at once. Including you can also add Microsof Exchange email account. If your workplace allow you, you can sync your Exchange account with your Galaxy SIII.
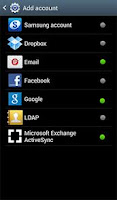
Adding of Microsoft Exchange email account
As written on bell.ca, here are the steps you need to do to add this kind of email account:
By knowing how to add an email account on your Galaxy SIII including your Exchange account, now you can check, send or sync your account with ease directly on your phone. But, please note that the setup for Exchange may vary slightly due to the corporate network infrastructure may also differ from each other. You can ask for help to your corporate IT dept if you have problems on your Exchange account. So, try this useful tips then share your experience here through the comment below :)
Here you can add multiple emails at once. Including you can also add Microsof Exchange email account. If your workplace allow you, you can sync your Exchange account with your Galaxy SIII.
Adding of Microsoft Exchange email account
As written on bell.ca, here are the steps you need to do to add this kind of email account:
- Go to Apps through Home screen.
- Scroll to Settings, then tap on it.
- Tap Accounts and sync.
- Tap Add account button.
- Tap Microsoft Exchange ActiveSync. When the dot indicator next to this option shows green means this option has been added.
- In the account field type your workplace email address.
- In the password field type your workplace email password.
- Tap Next button.
- In the domain field type the Domain name.
- Tap Hide keyboard key on the virtual keyboard.
- Tap Next button.
- Here you can determine the settings for your account option, then tap Next button.
- If you want to change the account name, type your new account name in the account name field.
- Tap Done button.
- Finish. Now your Microsoft Exchange email account has been successfully added to your phone.
By knowing how to add an email account on your Galaxy SIII including your Exchange account, now you can check, send or sync your account with ease directly on your phone. But, please note that the setup for Exchange may vary slightly due to the corporate network infrastructure may also differ from each other. You can ask for help to your corporate IT dept if you have problems on your Exchange account. So, try this useful tips then share your experience here through the comment below :)
How to Adding of POP3 Email Account
You can do many things by using Samsung Galaxy SIII as your device, from
making a call, write text or multimedia message, up to compose a new
email and then send it directly or scheduled.
The ability to check and send emails at any time is a consideration when a person wants to buy a smartphone. For this reason, today almost all smartphones equipped with email facilities, as well as in the Galaxy SIII.
To be able to communicate with others using email, you must have an email account first. Or if you already have an email account then you need to add it to your phone, so you can check or send email through this account in your phone.
How to add a POP3 email account?
As written on bell.ca, to do so kindly following the steps below:
By knowing on how to add pop3 email account, now you can check and send email from your account in your Galaxy SIII. So, try this useful tips then share your experience here through the comment below :)
The ability to check and send emails at any time is a consideration when a person wants to buy a smartphone. For this reason, today almost all smartphones equipped with email facilities, as well as in the Galaxy SIII.
To be able to communicate with others using email, you must have an email account first. Or if you already have an email account then you need to add it to your phone, so you can check or send email through this account in your phone.
How to add a POP3 email account?
As written on bell.ca, to do so kindly following the steps below:
- Go to Apps through Home screen.
- Scroll to Email, then tap on it .
- If you already have an email account setup that has been added in this phone, then tap the Menu key. If this is your first time to add an email account, go to step #6.
- On the pop up menu select Settings.
- To add an email account tap on Add button located on the top right corner of your phone's screen.
- In the email account field, type your email address.
- In the password field, type your email password.
- Tap Next button.
- Here you will be asked to specify the settings for the email check frequency.
- Tap Next button.
- If necessary you can also change account's name here by filling out a new name in the account name field.
- Tap Done button.
- Finish. Now your POP3 email account has been successfully added to your phone.
By knowing on how to add pop3 email account, now you can check and send email from your account in your Galaxy SIII. So, try this useful tips then share your experience here through the comment below :)
Sending Email with Picture or Video Attachments in Samsung Galaxy S3

But, there are times when you might want to add another file in your email. This can be done either directly or by using a certain app that will allow you to be able to attach any files on email.
But, if you want to send emails with attachments of a picture or video, you can just do it without the need to use any third-party applications. Because by default, the Samsung Galaxy S3 supports attachment to both types of these files.
How to send email with attachment?
As written on support.bell.ca, here are the steps you need to do to send email with video or picture attachment:
- Go to Apps through Home screen.
- Scroll to Email, then tap on it.
- Tap on Compose to create new email.
- Enter recipient e-mail addresses or you can pick them from the Contacts.
- Tap on Done button when you are finished entering the email address of the recipient.
- Tap on Subject then enter your email subject.
- Tap on the text input area to start writing an email.
- Tap on Attach buttton located on the upper right side of the screen to add an attachment in your email.
- Tap on the required option, such as picture or video.
- Select and tap on the picture or video you want.
- Tap on the image or the video size you want.
- Tap on OK button.
- Tap on Send button located on the top right corner of the screen to send your email.
- Finish. Your email with attachments have successfully sent.
Well, it's easy, right? So, try this useful feature then share your experience here through the comment below :)


0 comments:
Post a Comment